Copying machine.
The internet is jus a big copying machine
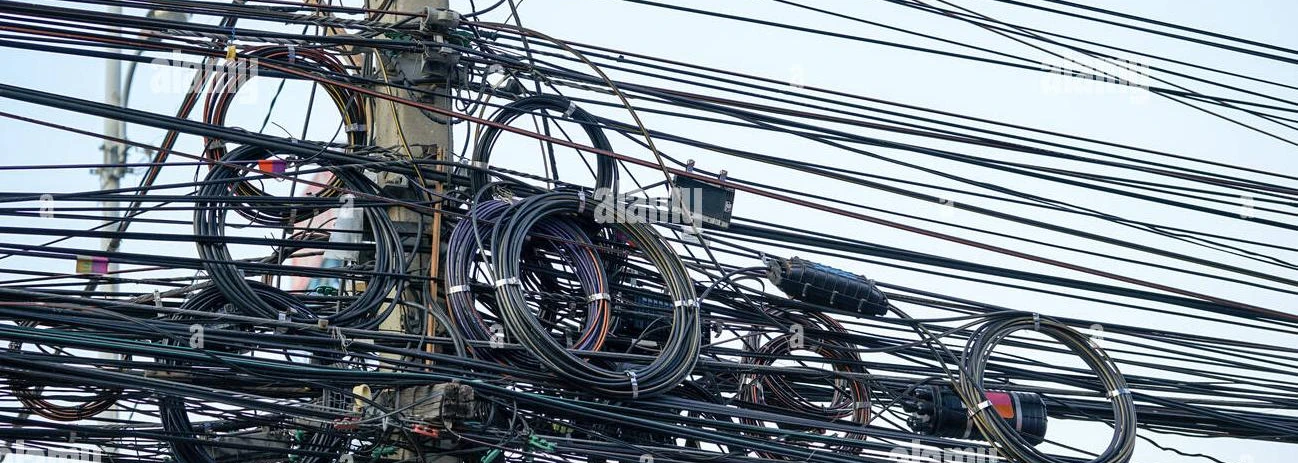
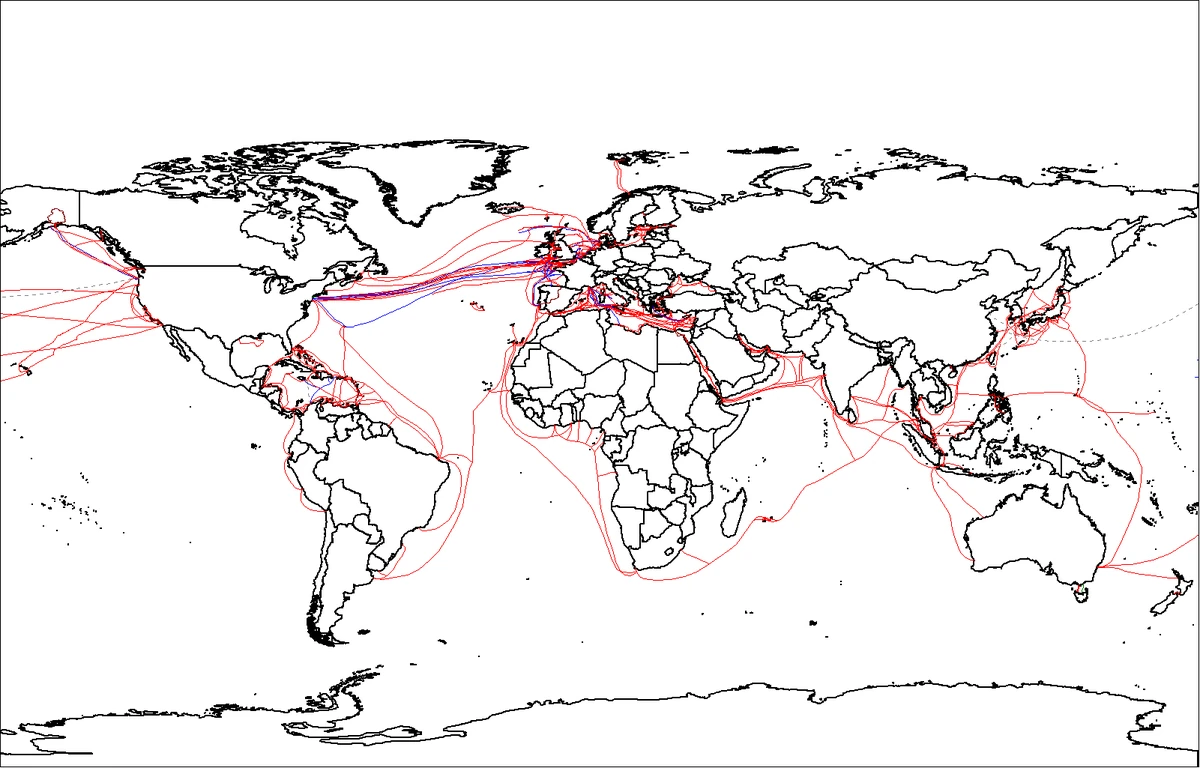
The Internet is the global system of interconnected computer networks that uses the Internet protocol suite (TCP/IP) to communicate between networks and devices. It is a network of networks that consists of private, public, academic, business, and government networks of local to global scope, linked by a broad array of electronic, wireless, and optical networking technologies. The Internet carries a vast range of information resources and services, such as the interlinked hypertext documents and applications of the World Wide Web (WWW), electronic mail, telephony, and file sharing.
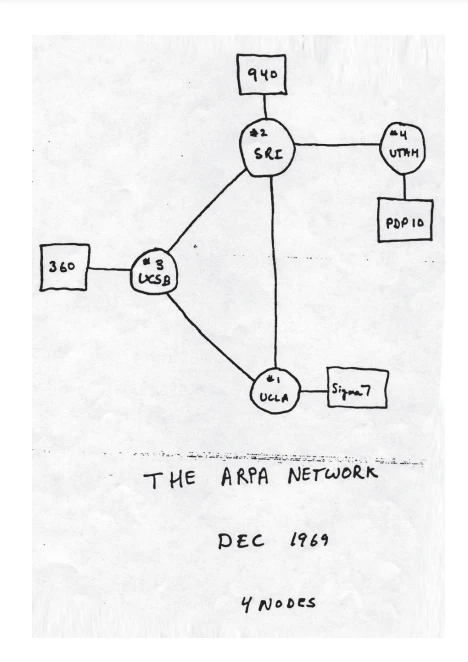
The origins of the Internet date back to research that enabled the time-sharing of computer resources, the development of packet switching in the 1960s and the design of computer networks for data communication. The set of rules (communication protocols) to enable internetworking on the Internet arose from research and development commissioned in the 1970s by the Defense Advanced Research Projects Agency (DARPA) of the United States Department of Defense in collaboration with universities and researchers across the United States and in the United Kingdom and France. The ARPANET initially served as a backbone for the interconnection of regional academic and military networks in the United States to enable resource sharing.

Internet is the most complex copying machine ever invented. If you think about it, at the end a network of devices are only copying bits from one place to another. When you access a website your'e only copying a file from one computer to yours.
If you agree with the previous statement then you will agree with the fact that The cloud does not exist, only hard drives on other people computers.
Why?
The use of communication networks and protocols is based on the idea of distributing and connecting systems by any of the following reasons:
- Location: It is not possible to perform all processing/calculation or hardware management tasks in the same site
- Parallelism: To be able to do things in parallel
- Modularity: Make developments in modules, each with a very specific function, easily scalable and more easily repairable
- Access Human access to data in different locations.

And maybe... why not?
Do you really need to be always connected? try local first, and maybe, if there is a reason, go up one layer at a time. Some numbers about Loneliness and (networked) Social Connections

Knowledge, ethics and generally culture are related to where you live (in the physical world), a lot of clues indicate that this is related to communication capabilities. What happens when the relation between geography and culture is broken? can ethics be unrelated to your context?
Protocols & networks
A network (in the context of this class) is a set of devices connected to each other through any type of communication lines that allows the exchange of data between them.

A communication protocol is a system of rules that allows two or more entities of a communications system to transmit information via any kind of variation of a physical quantity. The protocol defines the rules, syntax, semantics and synchronization of communication and possible error recovery methods. Protocols may be implemented by hardware, software, or a combination of both
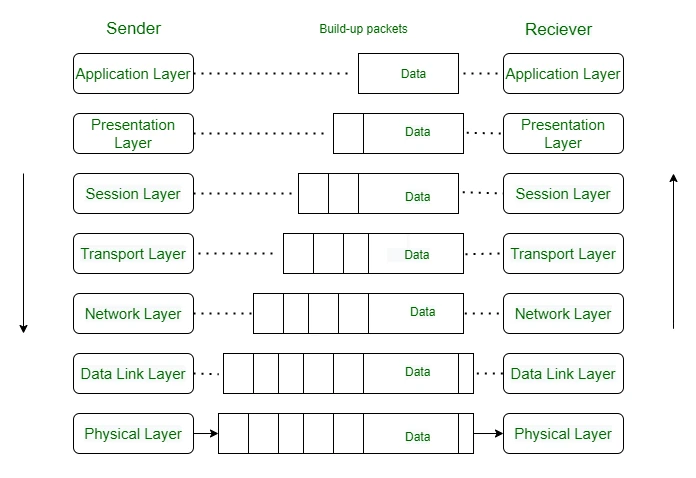
Onions and layers

TCP/IP
TCP/IP stands for Transmission Control Protocol/Internet Protocol. It has 4 layers named as Physical layer, Network layer, Transport layer, and Application layer. It also can be used as a communications protocol in a private computer network. It was designed by Vint Cerf and Bob Kahn in the 1970s.

OSI model
OSI stands for Open Systems Interconnection. It has 7 layers Physical layer, Data Link layer, Network layer, Transport layer, Session layer, Presentation layer, and Application layer. Each layer performs its task independently. It was developed in 1984 by the International Organization for Standardization (ISO).
How the web works
Curso CCNA en youtube
Basics of Computer Networking on geeks for geeks
Tipos de redes
Computer networks may be classified by many criteria, including the transmission medium used to carry signals, bandwidth, communications protocols to organize network traffic, the network size, the topology, traffic control mechanisms, and organizational intent.
Medio de transmisión
En función del medio de transmisión: cable, óptico, radio frecuencia
A transmission medium is a system or substance that can mediate the propagation of signals for the purposes of telecommunication. Signals are typically imposed on a wave of some kind suitable for the chosen medium. For example, data can modulate sound, and a transmission medium for sounds may be air, but solids and liquids may also act as the transmission medium
Topología
En función de la topología
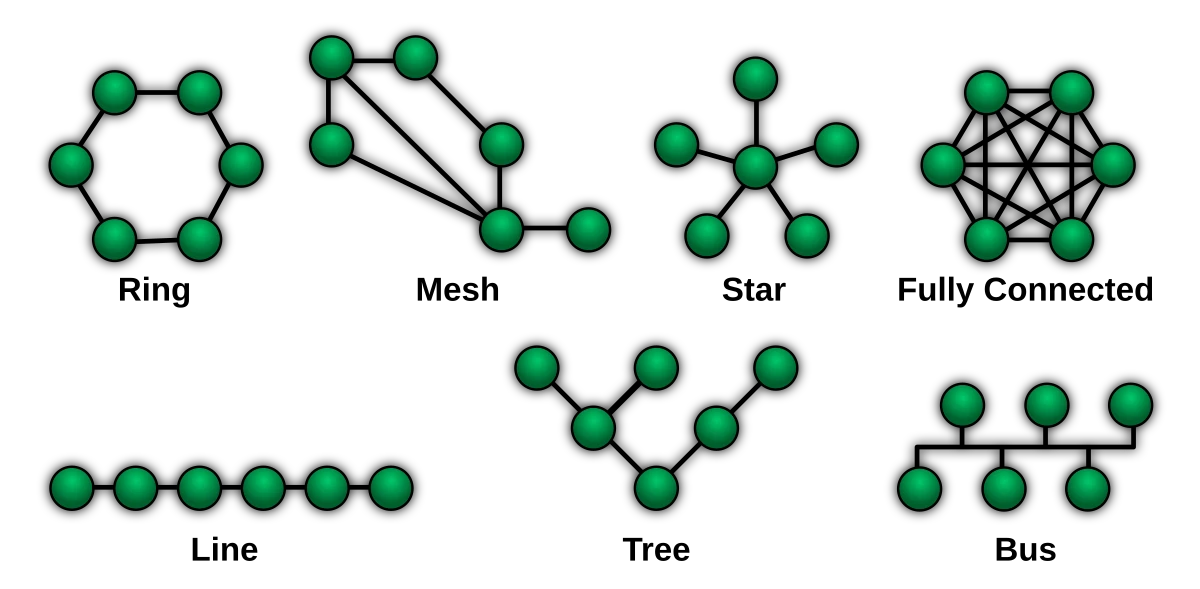
The physical or geographic locations of network nodes and links generally have relatively little effect on a network, but the topology of interconnections of a network can significantly affect its throughput and reliability. With many technologies, such as bus or star networks, a single failure can cause the network to fail entirely. In general, the more interconnections there are, the more robust the network is; but the more expensive it is to install.
Rango
En función de su rango:
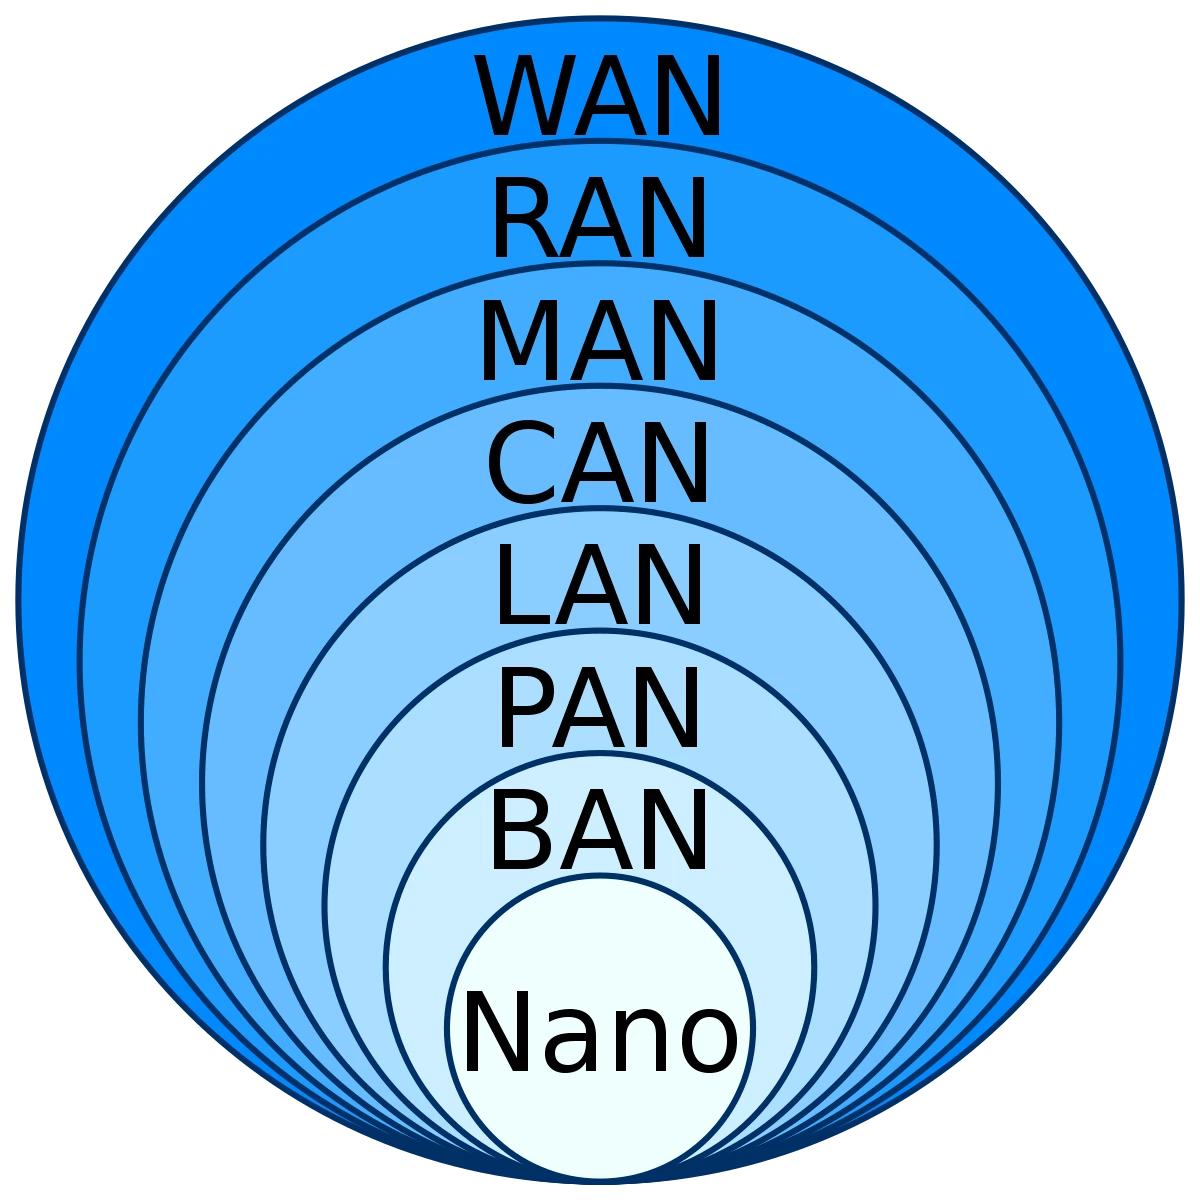
Networks may be characterized by many properties or features, such as physical capacity, organizational purpose, user authorization, access rights, and others. Another distinct classification method is that of the physical extent or geographic scale.
Network tools
Ping
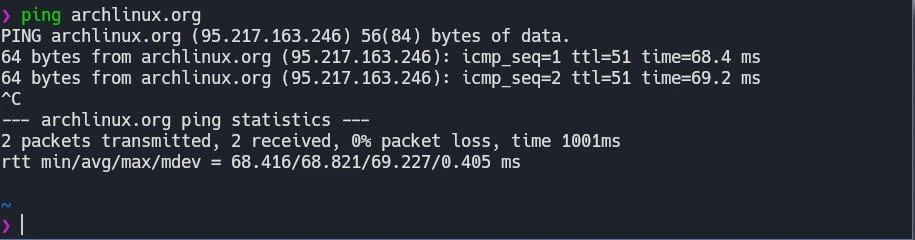
Ping measures the round-trip time for messages sent from the originating host to a destination computer that are echoed back to the source. The name comes from active sonar terminology that sends a pulse of sound and listens for the echo to detect objects under water.
Traceroute
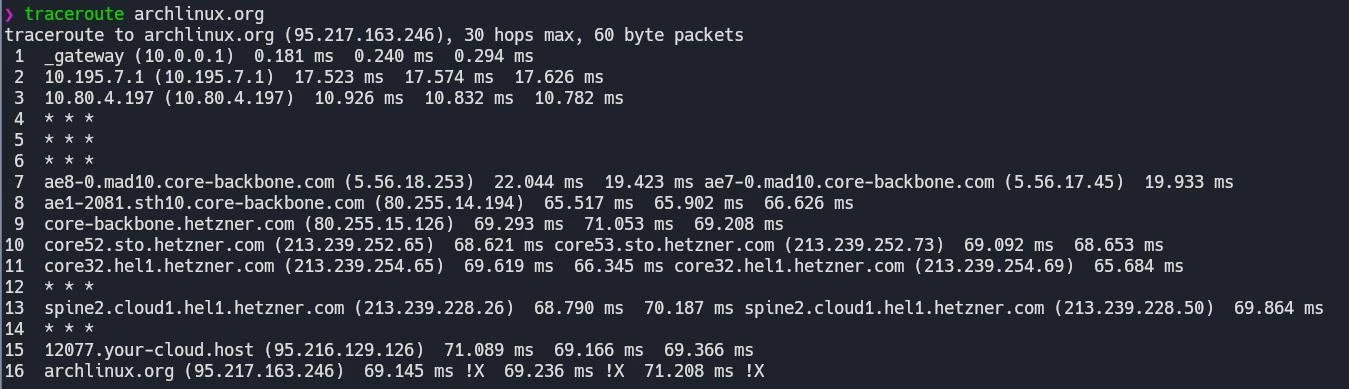
In computing, traceroute and tracert are diagnostic command-line interface commands for displaying possible routes (paths) and transit delays of packets across an Internet Protocol (IP) network.
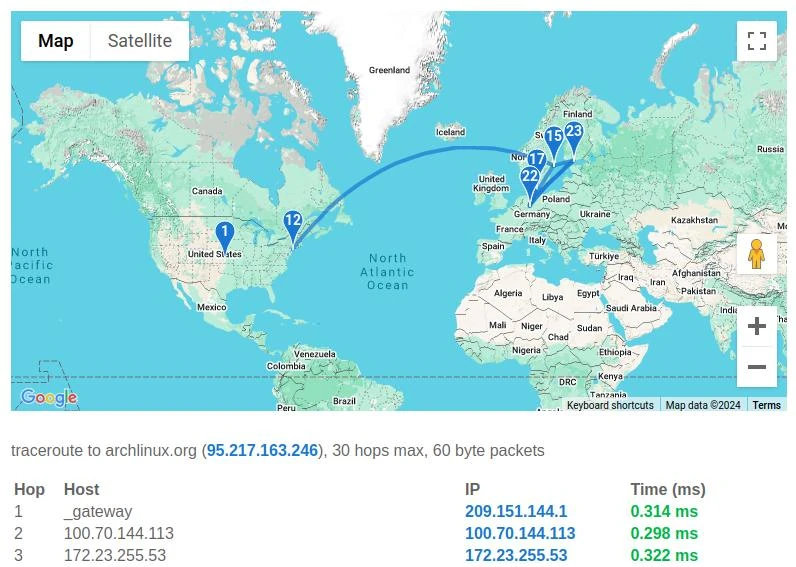
Esta imagen se genero en un traceroute visual online, solo tienes que ingresar el sitio que te interesa.
whois
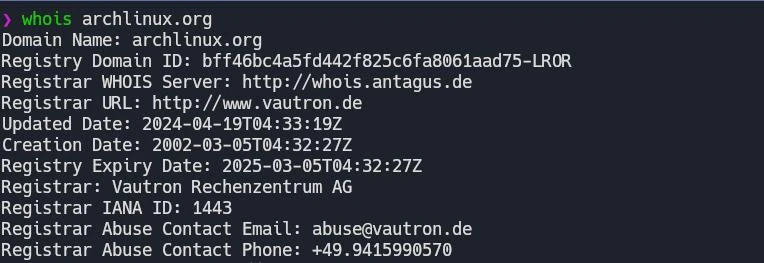
WHOIS (pronounced as the phrase "who is") is a query and response protocol that is used for querying databases that store an Internet resource's registered users or assignees. These resources include domain names, IP address blocks and autonomous systems, but it is also used for a wider range of other information.
Packet analizer or sniffer 👃
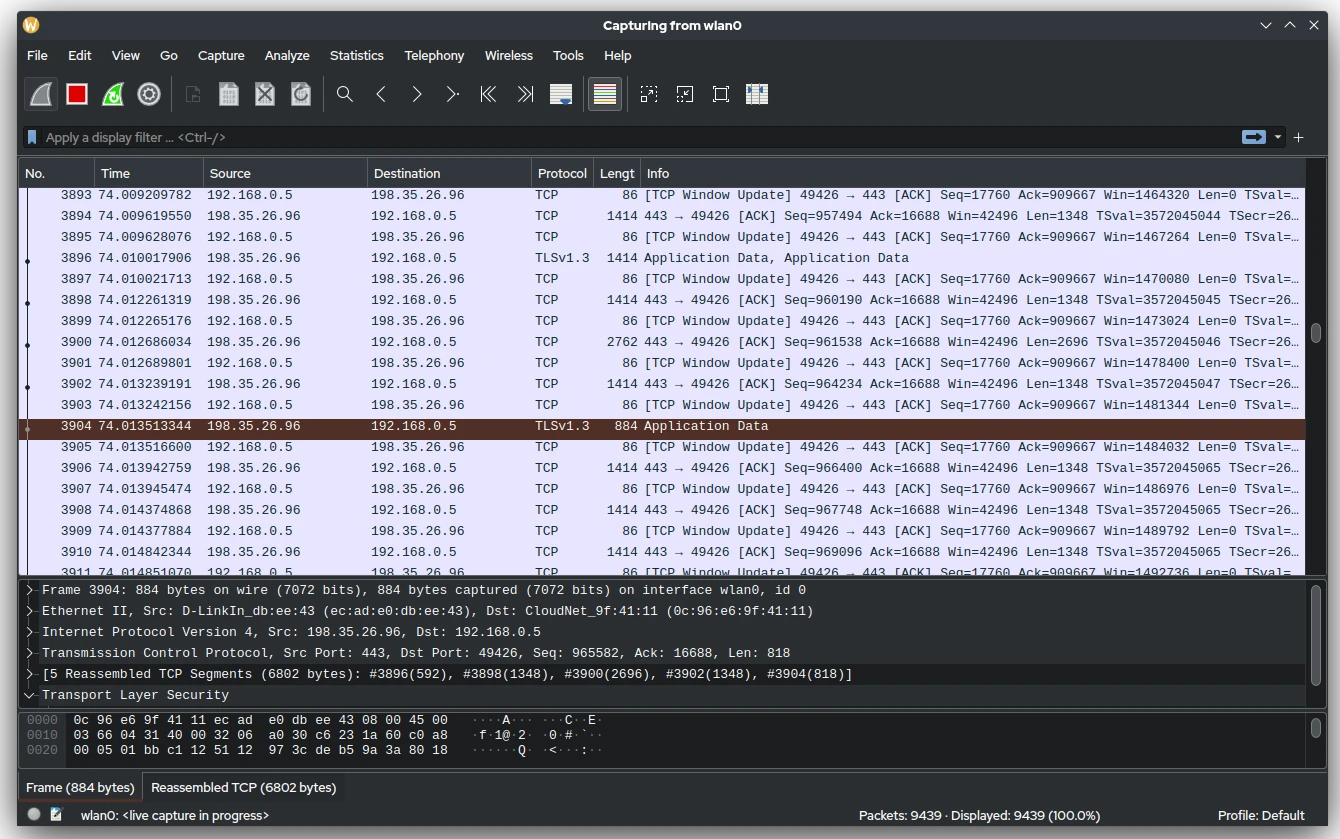
A packet analyzer (also packet sniffer or network analyzer) is a computer program or computer hardware such as a packet capture appliance that can analyze and log traffic that passes over a computer network or part of a network.
Si quieres probar, uno de los sniffers más populares es wireshark
Comunicación por cable
Las redes por cable implican que el medio físico de transmisión de información se realiza por uno o más cables. Al igual que las redes en general, se pueden clasificar de muchas maneras, pero nos centraremos en:
- Asíncronas vs. síncronas
- Serie vs. Paralelo
Usamos comunicación asíncrona cuando la información se puede enviar sin requerimientos de timing muy estrictos, normalmente a baja velocidad. Este método implica que ambos finales de la comunicación tienen que usar una misma velocidad en la transmisión. El más conocido es el protocolo RX/TX, o simplemente protocolo Serial.

📖 sparkfun
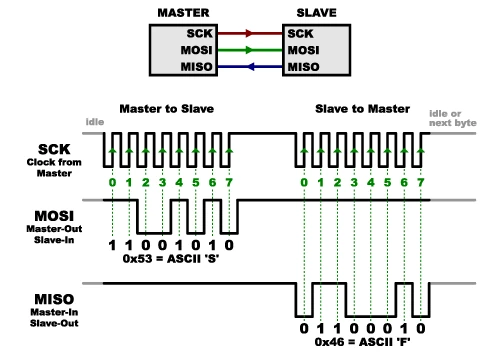
Por el contrario, usamos comunicación síncrona cuando se envía una señal de reloj (una especie de metrónomo), que sincroniza ambas partes. Aparte de necesitar un cable adicional, estas redes suelen ser más avanzadas y permiten una comunicación más rápida. Protocolos de este tipo son I2C, SPI, LIN. Normalmente suelen tener una estructura donde un maestro gestiona peticiones al resto de componentes de la red:
📖 sparkfun
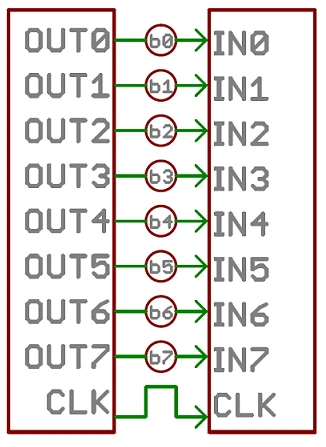
La comunicación en paralelo transmite muchos bits a la vez, transmitiendo en 8, 16 o más cables. Muchos datos se envían a la vez, pero con muchos cables:
📖 sparkfun
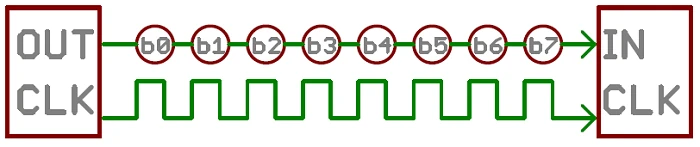
Las interfaces en serie, envían sus datos con una señal de referencia, un bit cada vez, en serie. Pueden tener uno, o más cables, aunque normalmente no más de cuatro:
📖 sparkfun
Ejemplos
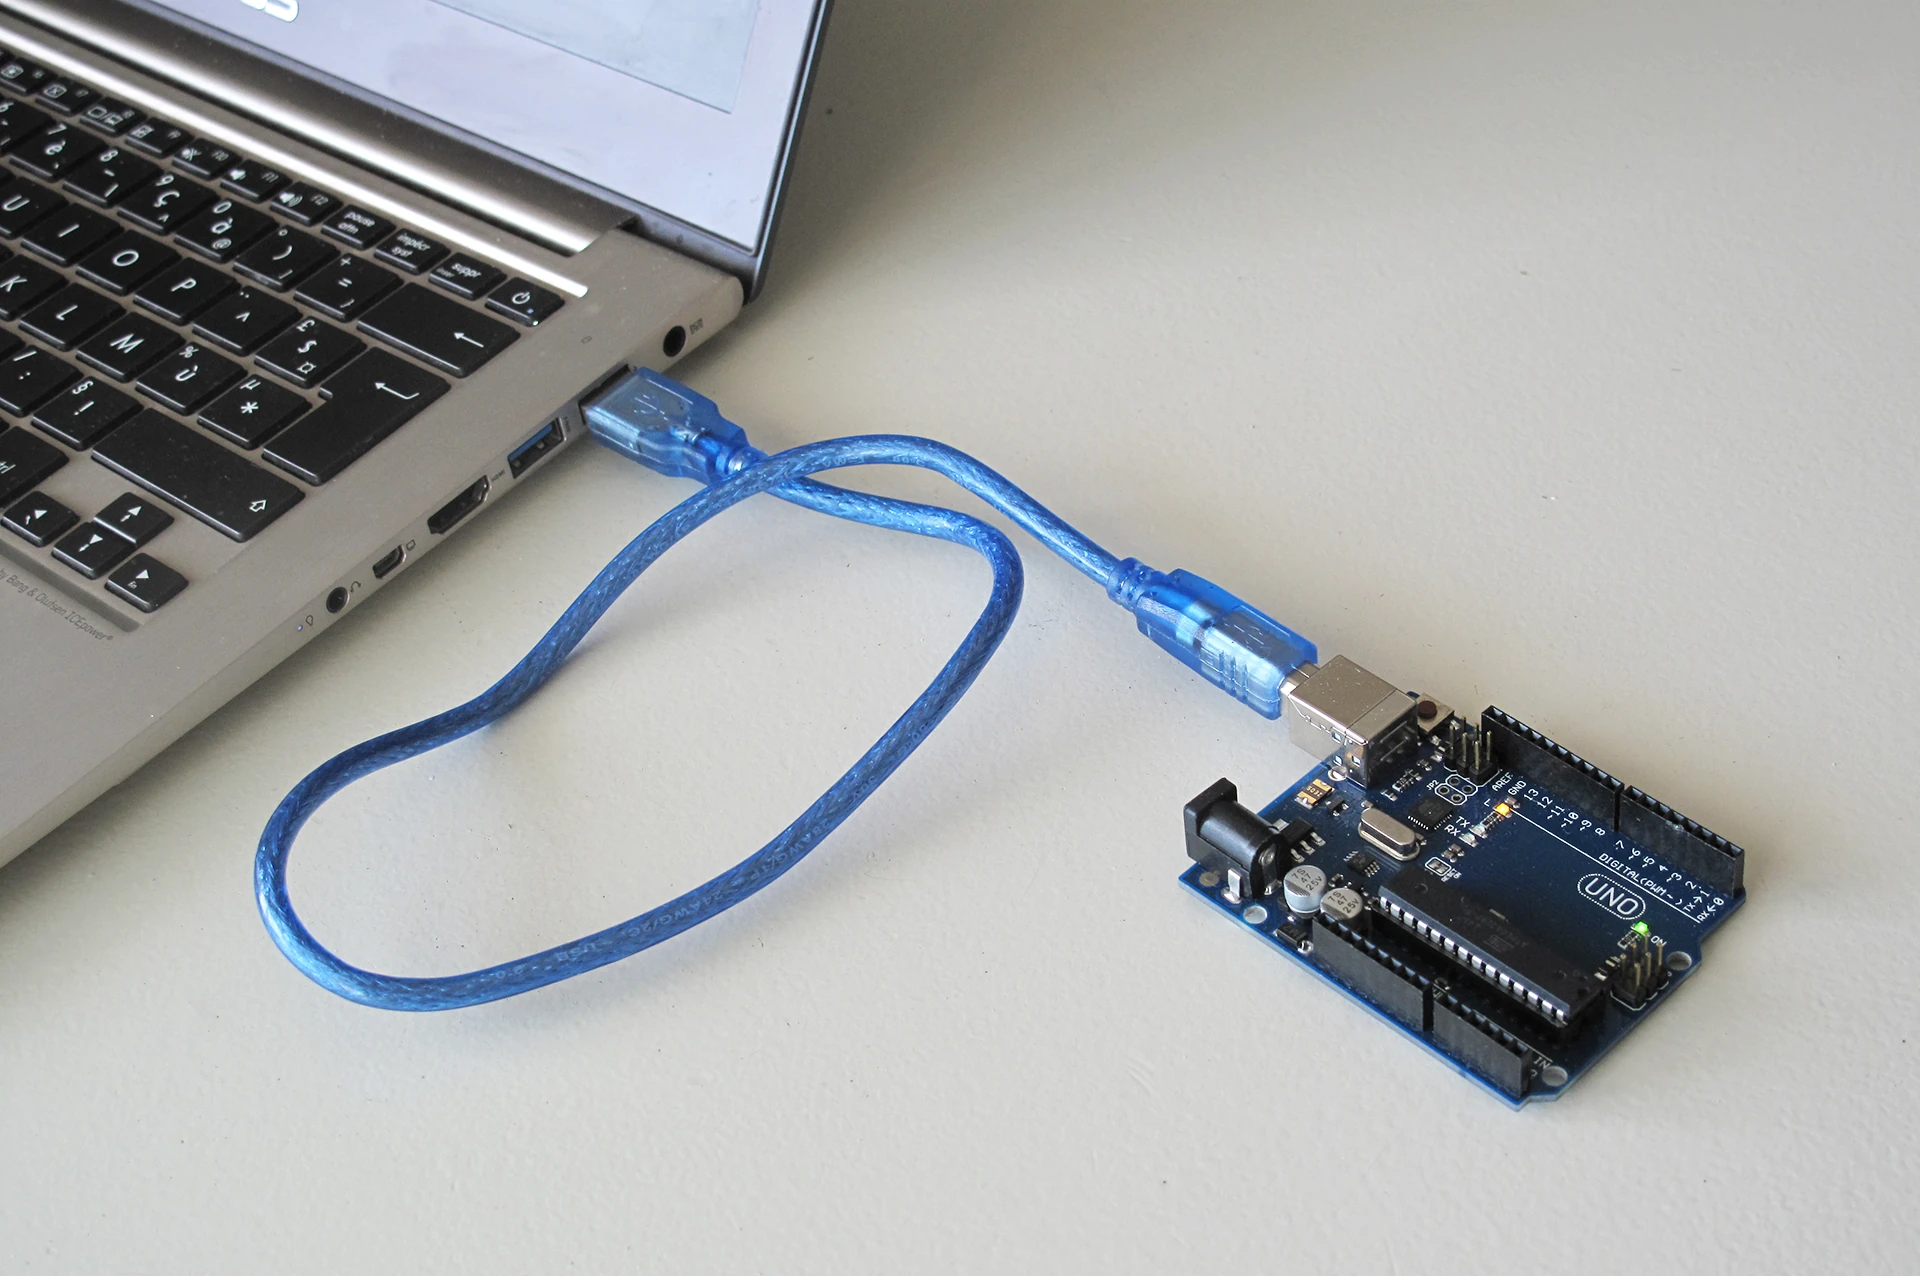
- Para conectar un ordenador a un arduino, usamos un cable USB, que es un protocolo Serie:
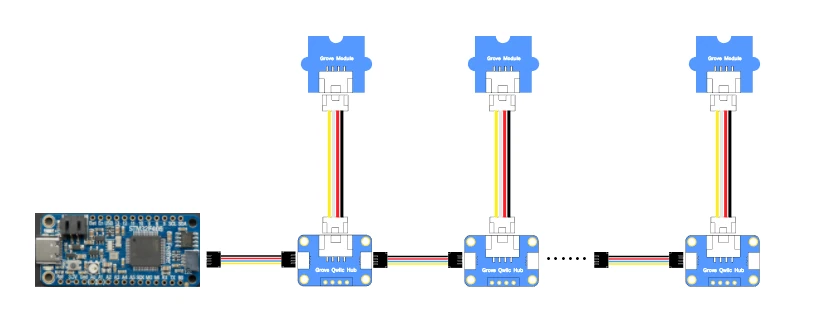
- Para conectar microcontroladores entre ellos, podemos usar SPI, I2C, UART (RX/TX). Lo mismo que para conectar muchos sensores modernos a microcontroladores:
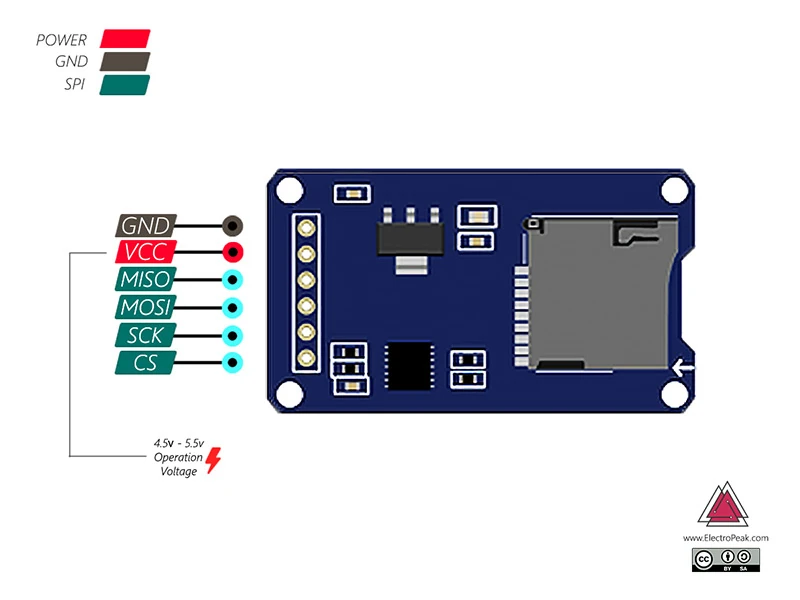
- Para leer una tarjeta SD desde un microcontrolador, se usa el protocolo SPI:
- En los vehículos (automoción) se usan protocolos de alta velocidad y robustez: CAN, LIN
- En teatros, para controlar la iluminación, se usa DMX
Comunicaciones sin cable

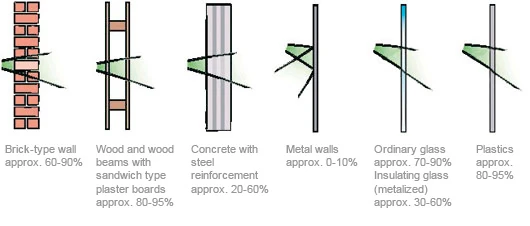
Las redes de comunicación sin cable (Wireless) aparecen gracias a nuestra capacidad de modular el espectro acústico o electromagnético y codificar información en él. Normalmente, la frecuencia de la onda que se usa para la comunicación es el factor más importante de cara a su implementación y clasificación:
En función de ésta, y de la potencia de la señal, tendremos más o menos penetración, y con ello, más o menos alcance:
También es importante tener en cuenta el tipo de antena:
- monopole, dipole
- helical
- patch
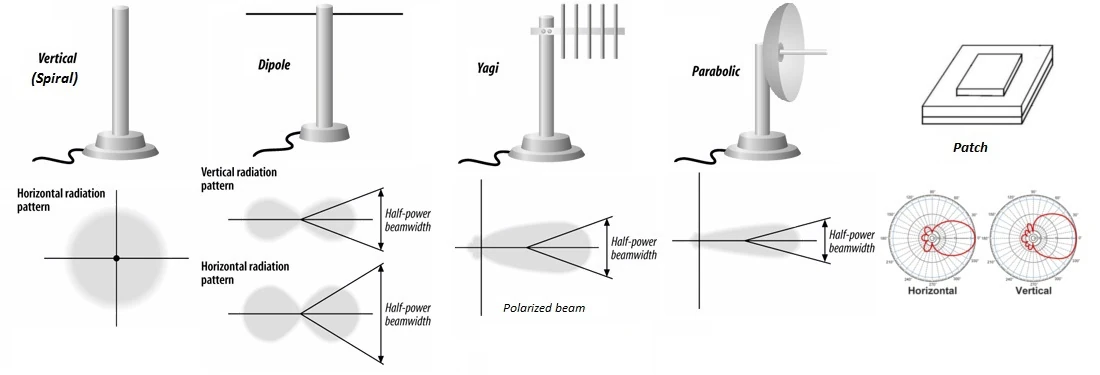
Es común oir que la ganancia de las antenas hacen que tengamos mayor rango, pero no es cierto. Las antenas no amplifican sino que cambian cómo se radia la señal.
La codificación viene dada normalmente por cómo realizamos modulación de una señal, y con estos, hay muchos tipos:
- PCM: Pulse-Code Modulation
- PPM: Pulse-Position Modulation
- OOK: On-Off Keying
- FSK: Frequency-Shift Keying
- BPSK: Binary Phase-Shift Keying
- QAM: Quadrature Amplitude Modulation
- OFDM: Orthogonal Frequency-Division Multiplexing
- FHSS: Frequency-Hopping Spread Spectrum
- DSSS: Direct-Sequence Spread Spectrum
- UWB: Ultra-WideBand
Con todo esto, existen distintos protocolos de comunicación, con distintos objetivos, rangos y anchos de banda:
- Radiofrecuencia:
- Óptico:
- Acústico:
Casos prácticos
Serial en Arduino
Arduino implementa en todas sus placas la posibilidad de comunicarse con ellas a través de la librería Serial: https://docs.arduino.cc/language-reference/en/functions/communication/Serial/
Se usa para la comunicación entre la placa de Arduino y otros dispositivos, entre ellos nuestro ordenador. Todas las placas tienen al menos un puerto, (también conocido como UART o USART).
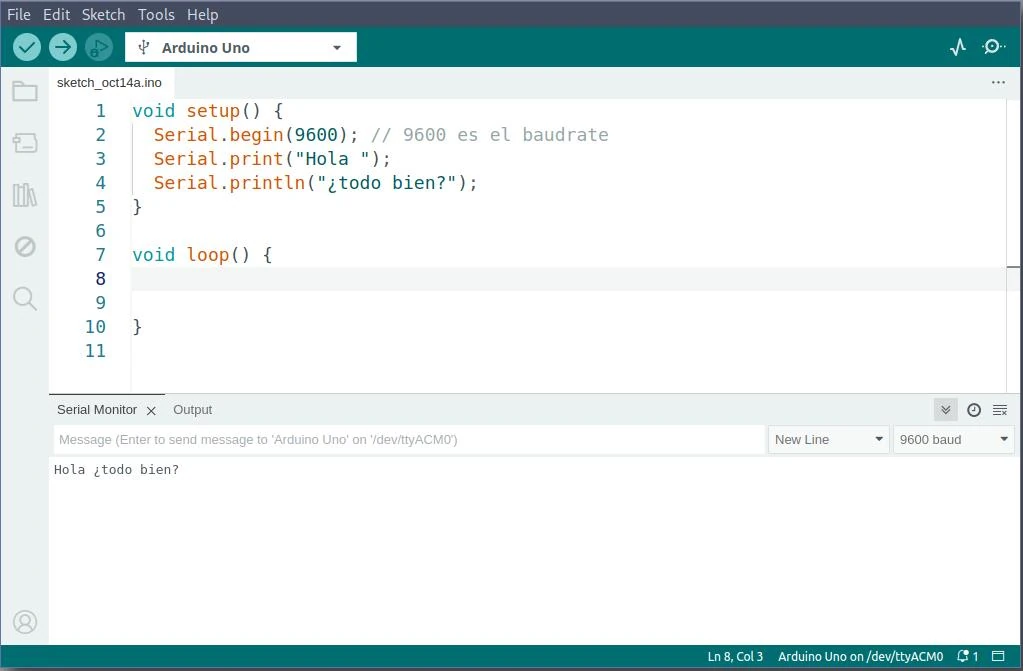
Para usarla, simplemente es necesario abrir el puerto Serial con:
void setup(){
    Serial.begin(9600); // 9600 es el baudrate
}
luego podemos enviar algo:
Serial.print("Hola ");
Serial.println("¿todo bien?");
En el otro extremo, deberemos usar la misma velocidad (9600 en el caso de arriba) y podremos abrir la comunicación. En el Arduino IDE, existe un Monitor Serial que nos permite leer lo que recibimos, aunque existen otros muchas formas de abrir el puerto:
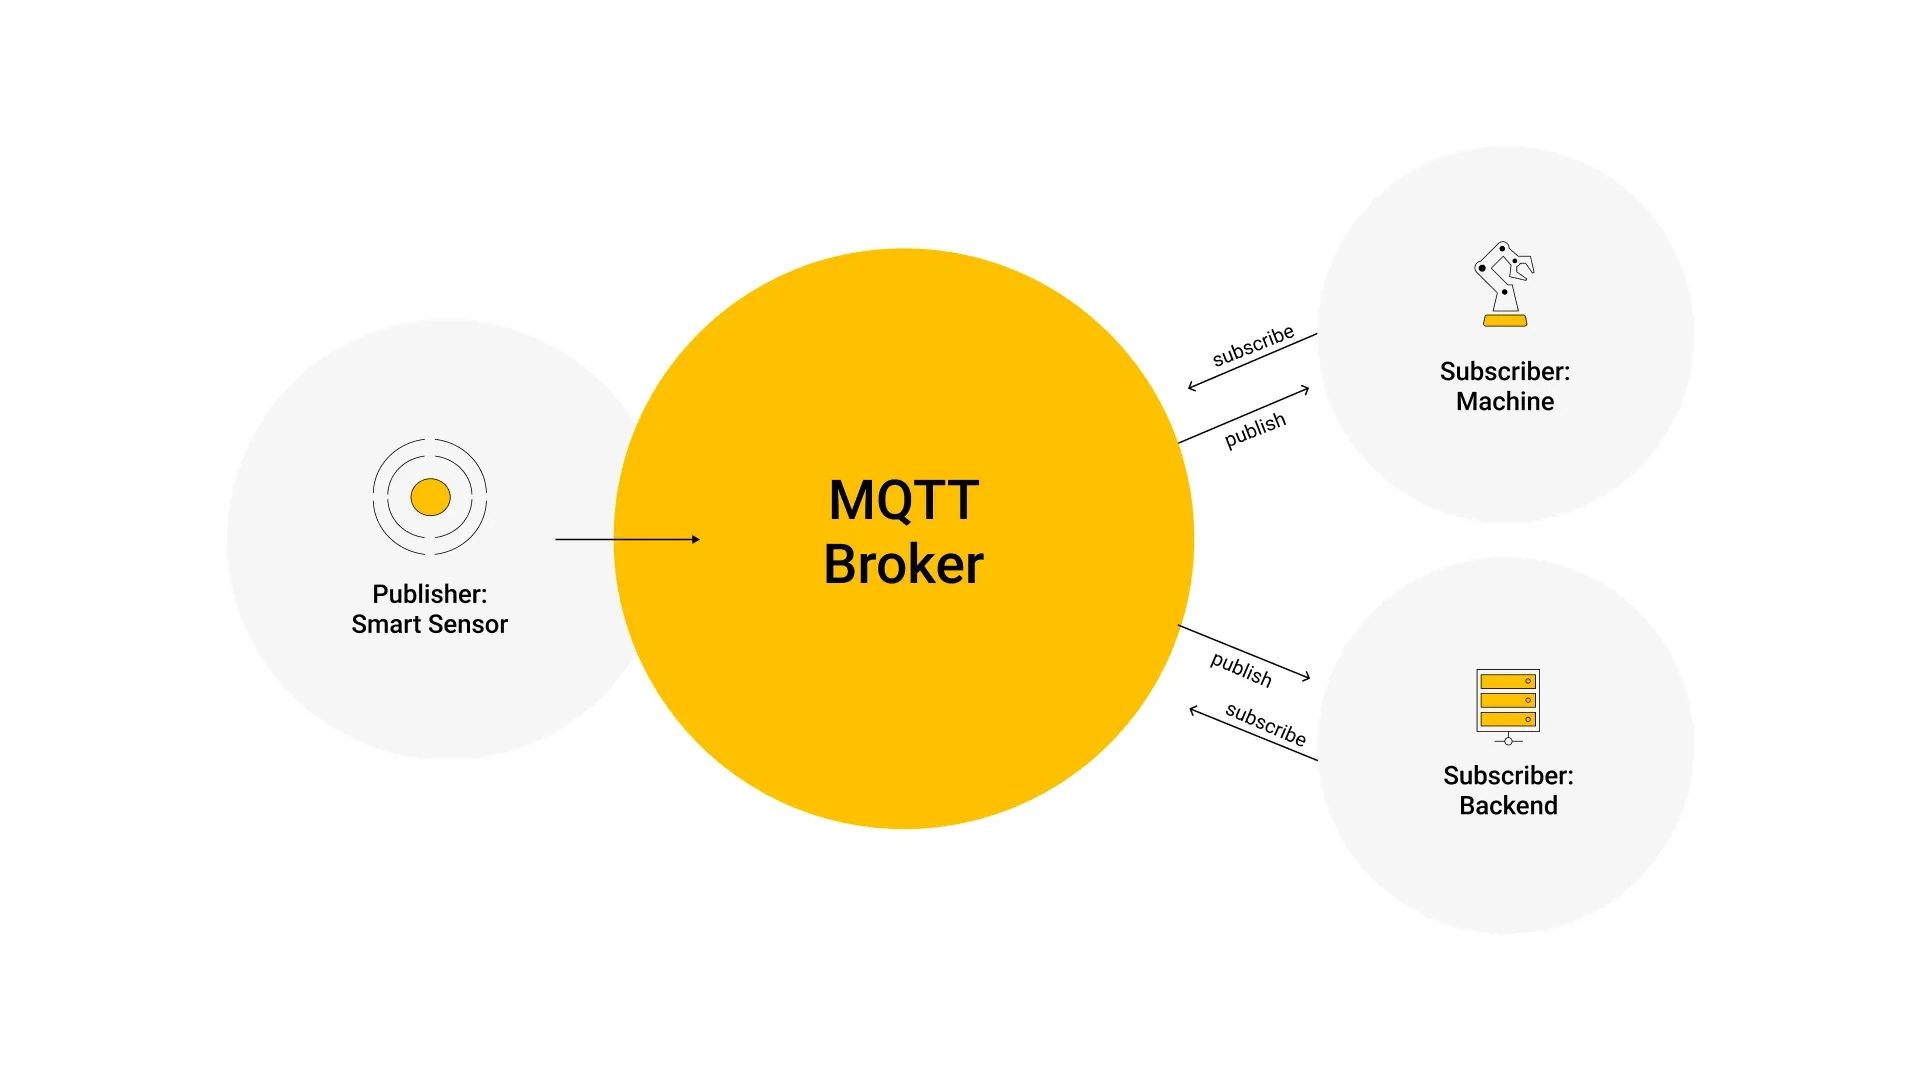
MQTT
MQTT es un protocolo que utiliza un modelo de publicación/subscripción basado en eventos, de forma que los mensajes se puedan enviar a clientes. La comunicación pasa por un punto central llamado broker, que se encarga de manejar el envío de mensajes entre los emisores y sus receptores. Cada cliente, cuando envía un mensaje, lo hace inclyendo un tópico en el mensaje (como si fuera una forma de categorizarlos).
El tópico es por tanto una forma de gestionar a dónde va la información dentro del broker. Cada cliente que quiere recibir un mensaje, se subscribe a un cierto tópico del broker y éste les envía los mensajes que correspondan. Por tanto, los clientes no se tienen que conocer entre ellos, lo único que hacen es comunicarse entorno al tópico.
📖 HiveMQ
Los tópicos son strings simples, con jerarquías, separados por una /:
casa/cocina/temperatura
casa/salon/ventilador
Se pueden usar wildcards para tener todos los diferentes niveles:
casa/+/temperaturarecibirá todas las temperaturas de la casacasa/salon/#retornará todos los mensajes relativos al salon
MQTT on Arduino IDE
Para hacer estos ejercicios utilizaremos la placa ESP32.
Lo primero es instalar la librería PubSubClient (MQTT) para Arduino:
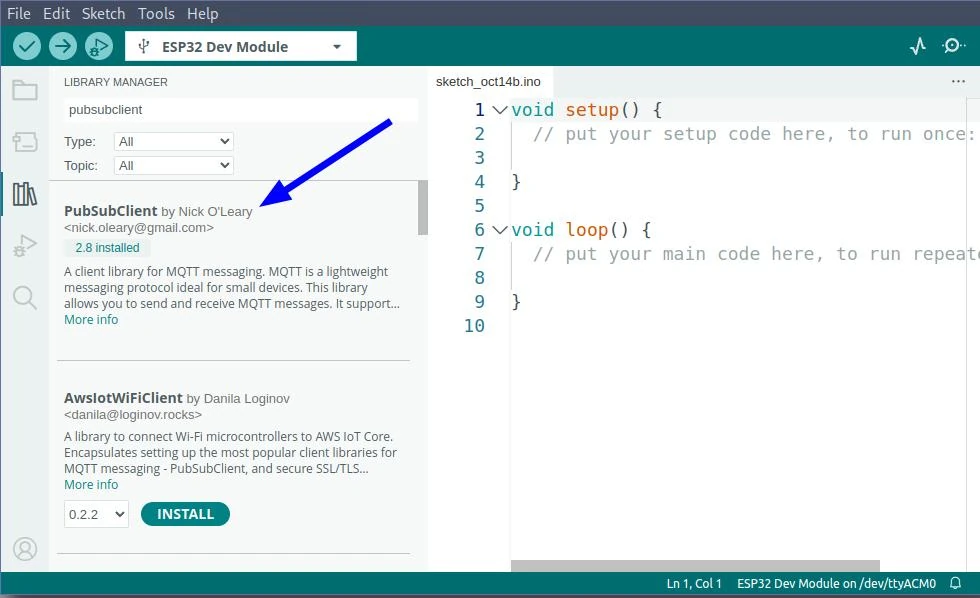
Para entender las capacidades de esta librería y saber cómo funciona puedes consultar su documentación
Recibiendo mensajes
Aquí tenemos un ejemplo del código necesario para recibir mensajes vía MQTT, cuando recibamos un "1" se prenderá el led y si recibimos cualquier otro mensaje, se apagará:
Para poder ver los cambios hay que conectar un led en el pin número 4

 Código de ejemplo para recibir mensajes vía MQTT
#include <WiFi.h>
#include <PubSubClient.h>

const char* ssid = "creatividad";
const char* password = "0123456789";
const char* mqtt_server = "192.168.4.1";
const char* inTopic = "clase/recibir";

int led_pin = 4;

WiFiClient wifiClient;
PubSubClient mqttClient(wifiClient);

void setup_wifi() {

  delay(10);
  Serial.println();
  Serial.print("Conectando a ");
  Serial.println(ssid);

  WiFi.mode(WIFI_STA);
  WiFi.begin(ssid, password);

  while (WiFi.status() != WL_CONNECTED) {
    delay(500);
    Serial.print(".");
  }

  Serial.println("");
  Serial.println("WiFi conectado!");
  Serial.println("direccion IP: ");
  Serial.println(WiFi.localIP());
}

void reconnect() {
  // Este ciclo se ejecuta hasta que se logra una conexion exitosa
  while (!mqttClient.connected()) {
    Serial.print("Intentando conexion MQTT...");
    // Creamos un ID random para nuestro cliente
    String clientId = "ESPClient-";
    clientId += String(random(0xffff), HEX);
    // Intentamos conectarnos
    if (mqttClient.connect(clientId.c_str())) {
      Serial.println("conectado");
      // **** Aqui nos subscribimos al tópico que nos interesa
      mqttClient.subscribe(inTopic);
    } else {
      Serial.print("Error, rc=");
      Serial.print(mqttClient.state());
      Serial.println(" probaremos de nuevo en 5 segundos");
      delay(5000);
    }
  }
}

void callback(char* topic, byte* payload, unsigned int length) {
  Serial.print("Mensaje recibido [");
  Serial.print(topic);
  Serial.print("] ");
  for (int i = 0; i < length; i++) {
    Serial.print((char)payload[i]);
  }
  Serial.println();

  // Prende el led si recibimos un 1 como primer caracter
  if ((char)payload[0] == '1') {
    digitalWrite(led_pin, HIGH);
  } else {
    digitalWrite(led_pin, LOW);
  }
}

void setup() {
    pinMode(led_pin, OUTPUT);
    Serial.begin(115200);
    setup_wifi();
    mqttClient.setServer(mqtt_server, 1883);
    mqttClient.setCallback(callback);
}

void loop() {
  if (!mqttClient.connected()) {
    reconnect();
  }
  mqttClient.loop();
}
Lo primero a notar es la línea donde nos subscribimos al tópico donde recibiremos los mensajes, si no estamos subscritos, aunque nuestro dispositivo funcione bien, no recibiremos nada!. En este ejemplo sólo nos subscribimos a un tópico, pero dependiendo de lo que necesitemos nos podríamos subscribir a más.
client.subscribe("inTopic");
La función más importante, que es donde se ejecuta el código que actúa ante el mensaje recibido es la función callback(). En ella recibimos tres parámetros:
topic: El nombre del tópico donde fue recibido el mensaje, para que esto funcione tendremos que habernos subscrito previamente a este topico específico.payload: El contenido del mensaje.length: El número de caracteres que contiene el mensaje.
Otra cosa importante que no hay que olvidar es cambiar el nombre (SSID) y password de nuestra red WiFi:
const char* ssid = "creatividad";
const char* password = "0123456789";
const char* mqtt_server = "192.168.4.1";
Además hay que especificar en que dirección IP estará nuestro brker de MQTT, si esta dirección no es correcta no podremos recibir ni enviar mensajes.
Publicando mensajes
Para publicar mensajes se utiliza un código muy similar, pero se debe agregar, en la función principal (loop()) el código necesario para obtener los datos (por ejemplo leer un sensor) y publicarlos a determinado tópico.
...
char msg[16];
int pubValue = 0;
...
void loop() {

  if (!mqttClient.connected()) {
    reconnect();
  }
  mqttClient.loop();


  // Esto es lo necesario para enviar un mensaje
  unsigned long now = millis();

  // Leemos el sensor aqui
  int value = analogRead(A0);
  delay(500); // Por si nuestro valor cambia demasiado rapido

  // Solo publicamos si el valor cambio
  if (value != pubValue) {

    pubValue = value;

    // Convertimos el valor numerico a caracteres
    snprintf (msg, 16, "%ld", value);
    Serial.print("Mensaje publicado: ");
    Serial.println(msg);

    // Aqui publicamos a un topico especifico (se puede cambiar el nombre aqui mismo)
    mqttClient.publish("clase/topico", msg);
  }
}
...
Recuerda que este código está inclompleto, sólo contiene lo que habría que agregar al ejemplo anterior (el de recibiendo mensajes).
ESP32 como AP y broker MQTT
Puedes convertir un ESP32 en un Access Point como el router de tu casa (obviamente sin salida a internet). Una limitación importante es que sólo puede darle conexión a 10 dispositivos simultáneamente, pero para la mayoría de las aplicaciones comunes es más que suficiente!
Para que el ESP32 además de ser un Access Point, se convierta en un broker MQTT hace falta instalar la librería picoMQTT, de la misma forma que hicimos con la librería PubSubClient a través del Manejador de Librerías de Arduino.
Este código es el más simple posible para lograr ambas tareas (click para verlo)
#include <WiFi.h>
#include <PicoMQTT.h>

PicoMQTT::Server mqtt;

const char* ssid     = "creatividad";
const char* password = "0123456789";

void setup() {
  Serial.begin(115200);

  Serial.print("Levantando el Access Point…");
  WiFi.mode(WIFI_AP);

  // WiFi.softAP(ssid, psk, channel, hidden, max_connection)
  WiFi.softAP(ssid, password, 1, false, 10);

  IPAddress IP = WiFi.softAPIP();
  Serial.print("Dirección IP del broker MQTT: ");
  Serial.println(IP);

  mqtt.begin();
}

void loop(){
  mqtt.loop();
}
Arduino input
Botón
Leer el estado del botón (HIGH o LOW) y enviarlo por MQTT cuando cambie.

En el siguiente código se utilizan algunas funciones de arduino como:
int pin_boton = 4;
bool estado = LOW;

void setup() {
    pinMode (pin_boton, INPUT);
    Serial.begin(115200);
}

void loop() {
    // Leemos el nuevo estado de el botón
    bool estado_nuevo = digitalRead(pin_boton);

    // Si el estado cambió lo publicamos
    if (estado != estado_nuevo) {
        estado = estado_nuevo;
        Serial.println(estado);
    }

    delay(50);
}
El código de arriba sólo es para probar que nuestro botón funciona correctamente y que lo podemos leer.
No envía ningún mensaje por MQTT
En este ejemplo está el código completo para enviar el mensaje MQTT.
#include <WiFi.h>
#include <PubSubClient.h>

const char* ssid = "creatividad";
const char* password = "0123456789";
const char* mqtt_server = "192.168.4.1";

int pin_boton = 4;
bool estado = false;

WiFiClient wifiClient;
PubSubClient mqttClient(wifiClient);

void setup_wifi() {

  delay(10);
  Serial.println();
  Serial.print("Conectando a ");
  Serial.println(ssid);

  WiFi.mode(WIFI_STA);
  WiFi.begin(ssid, password);

  while (WiFi.status() != WL_CONNECTED) {
    delay(500);
    Serial.print(".");
  }

  Serial.println("");
  Serial.println("WiFi conectado!");
  Serial.println("direccion IP: ");
  Serial.println(WiFi.localIP());
}

void reconnect() {
  // Este ciclo se ejecuta hasta que se logra una conexion exitosa
  while (!mqttClient.connected()) {
    Serial.print("Intentando conexion MQTT...");
    // Creamos un ID random para nuestro cliente
    String clientId = "ESPClient-";
    clientId += String(random(0xffff), HEX);
    // Intentamos conectarnos
    if (mqttClient.connect(clientId.c_str())) {
      Serial.println("conectado");
    } else {
      Serial.print("Error, rc=");
      Serial.print(mqttClient.state());
      Serial.println(" probaremos de nuevo en 5 segundos");
      delay(5000);
    }
  }
}

void setup() {
    pinMode(pin_boton, INPUT);
    Serial.begin(115200);
    setup_wifi();
    mqttClient.setServer(mqtt_server, 1883);
}

void loop() {
  if (!mqttClient.connected()) {
    reconnect();
  }
  mqttClient.loop();

  // Leemos el nuevo estado de el botón
  bool estado_nuevo = digitalRead(pin_boton);

  // Si el estado cambió lo publicamos
  if (estado != estado_nuevo) {
    estado = estado_nuevo;
    Serial.println(estado);
    if (estado) mqttClient.publish("clase/boton", "1");
    else mqttClient.publish(outTopic, "0");
  }
}
Potenciómetro
Leer el valor del potenciómetro (0-4096), traducirlo a un valor entre 0-100 y publicarlo sólo en caso de que cambie.

En el siguiente código utilizamos algunas funciones nuevas:
Este código sólo se lee el potenciómetro y se publica por el puerto serial, es para probar que nuestro circuito funciona correctamente, igual que en el caso anterior el código completo para publicar por MQTT esta más abajo.
int pin_pot = 34;
int valor = 0;

void setup() {
    pinMode(pin_pot, INPUT);
    Serial.begin(115200);
}

void loop() {
    // Leemos el nuevo valor
    int nuevo_valor = analogRead(pin_pot);

    // Si el nuevo valor es diferente (una diferencia mayor de 50 es un 1%) lo imprimimos.
    if (abs(nuevo_valor - valor) > 50) {
        valor = nuevo_valor;
        int porcentaje = map(valor, 0, 4096, 0, 100);
        Serial.println(porcentaje);
    }
}
Código completo para enviar el mensaje por MQTT
#include <WiFi.h>
#include <PubSubClient.h>

const char* ssid = "creatividad";
const char* password = "0123456789";
const char* mqtt_server = "192.168.4.1";

int pin_pot = 34;
int valor = 0;
char msg[16];

WiFiClient wifiClient;
PubSubClient mqttClient(wifiClient);

void setup_wifi() {

  delay(10);
  Serial.println();
  Serial.print("Conectando a ");
  Serial.println(ssid);

  WiFi.mode(WIFI_STA);
  WiFi.begin(ssid, password);

  while (WiFi.status() != WL_CONNECTED) {
    delay(500);
    Serial.print(".");
  }

  Serial.println("");
  Serial.println("WiFi conectado!");
  Serial.println("direccion IP: ");
  Serial.println(WiFi.localIP());
}

void reconnect() {
  // Este ciclo se ejecuta hasta que se logra una conexion exitosa
  while (!mqttClient.connected()) {
    Serial.print("Intentando conexion MQTT...");
    // Creamos un ID random para nuestro cliente
    String clientId = "ESPClient-";
    clientId += String(random(0xffff), HEX);
    // Intentamos conectarnos
    if (mqttClient.connect(clientId.c_str())) {
      Serial.println("conectado");
    } else {
      Serial.print("Error, rc=");
      Serial.print(mqttClient.state());
      Serial.println(" probaremos de nuevo en 5 segundos");
      delay(5000);
    }
  }
}

void setup() {
    pinMode(pin_pot, INPUT);
    Serial.begin(115200);
    setup_wifi();
    mqttClient.setServer(mqtt_server, 1883);
}

void loop() {
  if (!mqttClient.connected()) {
    reconnect();
  }
  mqttClient.loop();

  // Leemos el nuevo valor
  int nuevo_valor = analogRead(pin_pot);

  // Si el nuevo valor es diferente (una diferencia mayor de 50 es un 1%) lo imprimimos.
  if (abs(nuevo_valor - valor) > 50) {
    valor = nuevo_valor;
    int porcentaje = map(valor, 0, 4096, 0, 100);
    Serial.println(porcentaje);

    // Convertimos el valor numerico a caracteres
    snprintf (msg, 16, "%ld", porcentaje);
    Serial.print("Mensaje publicado: ");
    Serial.println(msg);

    // Aqui publicamos
    mqttClient.publish("clase/pot", msg);
  }
}
Arduino output
Led
Prender el Led cuando se reciba un uno y apagarlo cuando se reciba un cero. Recuerda verificar la polaridad del led!
Código completo para prender y apagar el led con un mensaje recibido por MQTT
#include <WiFi.h>
#include <PubSubClient.h>

const char* ssid = "creatividad";
const char* password = "0123456789";
const char* mqtt_server = "192.168.4.1";
const char* inTopic = "clase/boton";

int led_pin = 4;

WiFiClient wifiClient;
PubSubClient mqttClient(wifiClient);

void setup_wifi() {

  delay(10);
  Serial.println();
  Serial.print("Conectando a ");
  Serial.println(ssid);

  WiFi.mode(WIFI_STA);
  WiFi.begin(ssid, password);

  while (WiFi.status() != WL_CONNECTED) {
    delay(500);
    Serial.print(".");
  }

  Serial.println("");
  Serial.println("WiFi conectado!");
  Serial.println("direccion IP: ");
  Serial.println(WiFi.localIP());
}

void reconnect() {
  // Este ciclo se ejecuta hasta que se logra una conexion exitosa
  while (!mqttClient.connected()) {
    Serial.print("Intentando conexion MQTT...");
    // Creamos un ID random para nuestro cliente
    String clientId = "ESPClient-";
    clientId += String(random(0xffff), HEX);
    // Intentamos conectarnos
    if (mqttClient.connect(clientId.c_str())) {
      Serial.println("conectado");
      // **** Aqui nos subscribimos al tópico que nos interesa
      mqttClient.subscribe(inTopic);
    } else {
      Serial.print("Error, rc=");
      Serial.print(mqttClient.state());
      Serial.println(" probaremos de nuevo en 5 segundos");
      delay(5000);
    }
  }
}

void callback(char* topic, byte* payload, unsigned int length) {
  Serial.print("Mensaje recibido [");
  Serial.print(topic);
  Serial.print("] ");
  for (int i = 0; i < length; i++) {
    Serial.print((char)payload[i]);
  }
  Serial.println();

  // Prende el led si recibimos un 1 como primer caracter
  if ((char)payload[0] == '1') {
    digitalWrite(led_pin, HIGH);
  } else {
    digitalWrite(led_pin, LOW);
  }
}

void setup() {
    pinMode(led_pin, OUTPUT);
    Serial.begin(115200);
    setup_wifi();
    mqttClient.setServer(mqtt_server, 1883);
    mqttClient.setCallback(callback);
}

void loop() {
  if (!mqttClient.connected()) {
    reconnect();
  }
  mqttClient.loop();
}
ServoMotor
Rotar el Servo motor de acuerdo a el ángulo que recibimos en el mensaje MQTT:

En el siguiente código utilizamos una librería de Arduino llamada ESP32Servo que nos simplifica el control de un servo motor en las placas ESP32.
Utilizamos algunas funciones que no habíamos visto antes:
Código completo para rotar un servomotor al ángulo recibido en un mensaje MQTT
#include <WiFi.h>
#include <PubSubClient.h>
#include <ESP32Servo.h>

const char* ssid = "creatividad";
const char* password = "0123456789";
const char* mqtt_server = "192.168.4.1";
const char* inTopic = "clase/pot";

Servo mi_servo;
int pin_servo = 14;
String mensaje;
int angulo = 0;

WiFiClient wifiClient;
PubSubClient mqttClient(wifiClient);

void setup_wifi() {

  delay(10);
  Serial.println();
  Serial.print("Conectando a ");
  Serial.println(ssid);

  WiFi.mode(WIFI_STA);
  WiFi.begin(ssid, password);

  while (WiFi.status() != WL_CONNECTED) {
    delay(500);
    Serial.print(".");
  }

  Serial.println("");
  Serial.println("WiFi conectado!");
  Serial.println("direccion IP: ");
  Serial.println(WiFi.localIP());
}

void callback(char* topic, byte* payload, unsigned int length) {
  Serial.print("Message arrived [");
  Serial.print(topic);
  Serial.print("] ");
  String mensaje = "";
  for (int i = 0; i < length; i++) {
    Serial.print((char)payload[i]);
    mensaje += (char)payload[i];
  }
  Serial.println();

  // Ajustar el servo al angulo solicitado
  int porcentaje = mensaje.toInt();
  int angulo = map(porcentaje, 0, 100, 0, 180);
  mi_servo.write(angulo);
}

void reconnect() {
  // Este ciclo se ejecuta hasta que se logra una conexion exitosa
  while (!mqttClient.connected()) {
    Serial.print("Intentando conexion MQTT...");
    // Creamos un ID random para nuestro cliente
    String clientId = "ESPClient-";
    clientId += String(random(0xffff), HEX);
    // Intentamos conectarnos
    if (mqttClient.connect(clientId.c_str())) {
      Serial.println("conectado");
      // **** Aqui nos subscribimos al tópico que nos interesa
      mqttClient.subscribe(inTopic);
    } else {
      Serial.print("Error, rc=");
      Serial.print(mqttClient.state());
      Serial.println(" probaremos de nuevo en 5 segundos");
      delay(5000);
    }
  }
}

void setup() {
  Serial.begin(115200);
  mi_servo.attach(pin_servo);
  setup_wifi();
  mqttClient.setServer(mqtt_server, 1883);
  mqttClient.setCallback(callback);
}

void loop() {
 if (!mqttClient.connected()) {
    reconnect();
  }
  mqttClient.loop();
}
Referencias
The new internet: Project Gemini
Very nice course on Information Theory - Khan Academy
Internet Zero
Comunicaciones y redes IoT en learn.sparkfun
How the Internet works en thesquareplanet.com
Full networks course on LUC's Department of Computer Science
How to Build a Low-tech Internet on lowtechmagazine.com